Model railroading is a way of life. I love all aspects of the hobby whether it's in N, HOe, HOm, HO, ON30 or O. I'm game for 3d printing, airbrushing, machining, laser cutting, soldering track and any other method out there. I've been moving a lot lately, which has resulted in a lot of building, dismantling, and rebuilding. I will share as much as I can as I reconstitute my railways. You never know what you'll find, maybe something cool will pop up.
Monday, November 28, 2011
Shingle Shack and Shifty Shed 03
I shingled and shingled my heart out, only to discover that I should have had the sense to reinforce things. Cue screeching tires while I got some Masonite scraps and did an impromptu interior structure. Knew I should of done it first, but I was just so darn excited! Oh well. Somebody, me, had to take a break and switch to the other model. Cue Shifty Shack. . . . .
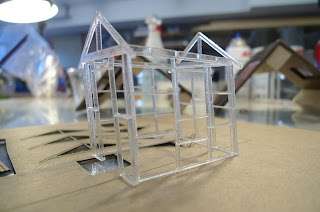
First go around, I cut the frame for the Shifty Shack from Cinch Board, similar to chip board, but has an interesting cross section that is very absorbent on the cut edge. By the time I primed the edges there was serious paint build up on the other surfaces, now good. Skipping ahead thanks to the fact I am doing these first posts after the fact, I switched to acrylic. . . .ahhh, that worked better.
I etched detail on what would be the interior. The thin cross section (almost a perfect scale 2x4) was made possible by having the laser skip around from place to place, and make multiple passes, thus allowing heat to dissipate while I cut. I first glued it with solvent, but quickly decided that CA would get me moving to the next step faster!
I hit it all with good ol' rusty metal primer. It sticks, and is a good base color for wood, and for rust, depending on how one finishes it.
Onwards!
Labels:
Model Building,
Structures
Subscribe to:
Post Comments (Atom)


No comments:
Post a Comment