Sunday, December 4, 2011

Burros. . . . . and friends

I managed to clean up the burros.  Broke one leg in the process, but a little brass wire and some careful drilling fixed that!  I also re-worked some gold miners that I purchased from www.peoplescale.com.  I was excited to find gold miners at a reasonable price.  After looking at the included figures I realized that the poses were a bit to active--a lot of mid motion movements.  These (to my eye) tend to look funny on a model railway.  There were also some odd anatomical anomalies--an arm bent in a direction it should not be, etc.  So, I set about modifying them to the best of my ability.  One of the miners, after having his arm fixed, received a shepherd's crook in place of his shovel--After prepping and adjusting the figures, everyone got a wire in their foot, or a couple of wires in their feet, to facilitate placing them someplace in the future.


It is nice that the burros were able to graze on a paper towel in the sun before I unceremoniously coated them with primer!


Shingle Shed and Shifty Shack 12

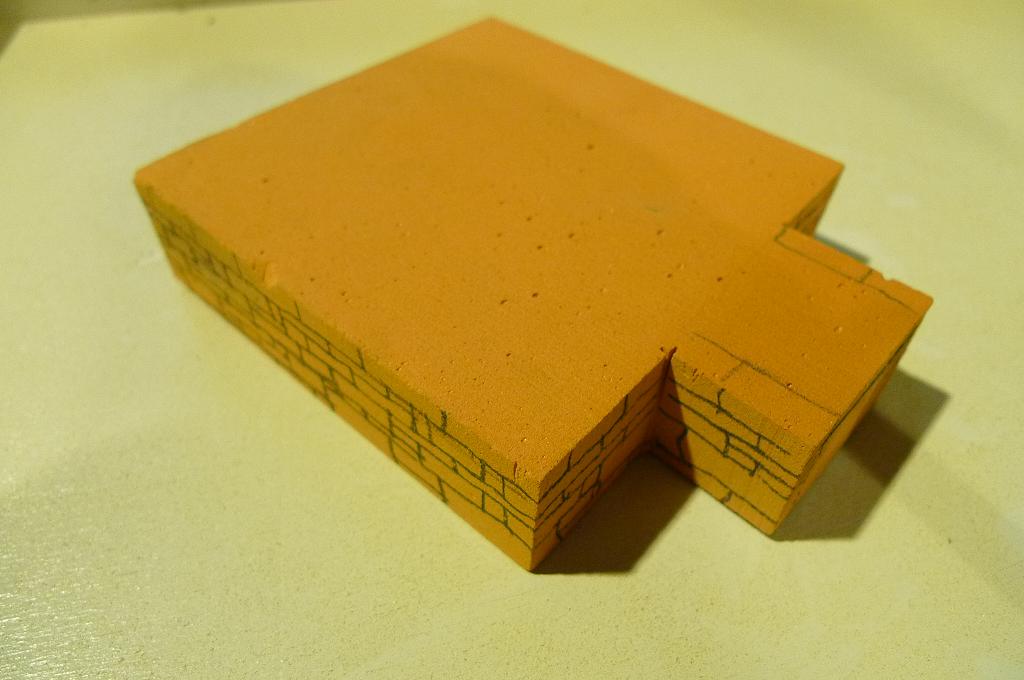
This is the foundation as it stands now. . . after dry brushing.


The uncarved bits are where it will be set into the ground.  I may go back and paint it one more time.  I wanted the foundation to look "cool" in order to warm up the wood.  If I were to go back, I would just repeat the previous procedure, building up more layers, but shifting the color slightly.  Before I decide whether I want to do that or not, I am going to take a look at it in the daylight. 

My desk lights, and the T5 fixtures in the workshop are all lamped with 3500k color temperature florescent bulbs, which are pretty darn good for color--all the same, I like for the models to look good under daylight or artificial lighting, so, before making big decisions I like to check both.  A good excuse to take a break after the sun goes down!

Shingle Shed and Shifty Shack 11

I started painting by first priming the "stone" foundation with some blue-gray latex paint that was laying about, a left over from painting a chicken coop?  Not sure, but it looked like a good starting color.  I stippled it into the balsa foam so as not to kill the texture, and ensure good adhesion.  Stippling also helps adhere any dust that you did not manage to dust or blow off.  I like to start stone (or shingle) painting with some color--blues for granite, reds if it were sandstone. . . but some color.  Anything but gray.


To that I add some other colors, mixed down yes, but clearly colorful all the same.  A lighter blue, a yellow, a sienna, and a red.  Not to fussy about it, just to get some variation in the undercoat.  Looks like one of those "Brick Face and Stucco" jobs from the 60's or 70's at this point.  In almost every case, I don't like the color to sit on the surface, rather, I layer it up, and allow previous layers to show through.  Those of you offended by the brightness of the above will be relieved when I. . . . .


Hit it with a control coat of 50% gray.  In this photo it is picking up some light.  Some of the gray will invariably come off, so, it is a tad heavy, but not bad.  Just a mixture of lamp black and titanium white acrylic blown through the airbrush--no need to get more complicated, since color from underneath comes through.

I left things to dry for a while.  An important step.  If you don't, working wet on top of this will result in paint soup. . . not good for models, and not flavorful.

The next bit looks scary, but it is not. . . . I put some ink (the cheap stuff for learning caligraphy) in a porcelain tray,  I also had some plain alcohol handy. 

Alternating between the alcohol and the ink, I blotted the wall heavily, my goal being to get the ink into the pores of the balsa foam (that is where stippling the primer coat helps--maintains the texture). 
Looks scary, but notice the sheen.  Paint has the foam sealed, so one can blot off the wall with a brush, or even a paper towel.


In the above photo things are still wet, but you can see how the ink finds and loves those painted pores of the foam.  Almost there.


Before going further, I did a little color check against the adjacent work.  It all looks dark, but that is ok, since the next step is to lighten it all up with some dry brushing of white paint. . . nothing more, nothing less. . . .


Shingle Shed and Shifty Shack 10

I continued to carve the balsa foam foundation.  The following photos give a clear idea of the process.  One begins with the basic outlines.  Next step is to progressively carve the stones, ultimately shaping them so that they seem to be individual stones.  The last carving step (to my eye) is to give the stones some surface variation, so that there are some "ins and outs".


As I near the end of carving, I am careful to test fit the foundation, and make any subtle adjustments so that the building and foundation will "feel as one" when ultimately joined.

You can see in the above photos, I carved the cobble ramp to the door, and adjusted the stones in on the back, giving the wall a "battered" appearance.  "Battering" meaning that it slightly steps back as the courses become higher.

Next step, paint!


Friday, December 2, 2011

Shingle Shed and Shifty Shack 09

Started carving the base for the Shingle Shed last night. 

The basic form was cut from a block of balsa foam using a back saw.  After I was satisfied with a drawing of the stone pattern, I proceeded to carve with a #16 blade.  If folks are interested, I will try to make a video showing how the balsa foam handles.  I love the way it carves--it really does "feel" like balsa without grain.


I left the tool marks, I think with some sanding, they will end up looking like part of the stone. . .  .

More sometime on the weekend.

Tuesday, November 29, 2011

Shingle Shed and Shifty Shack 08


Made a few daylight pictures this morning, with a better view of the roof.  There is nothing like sunlight!  Whatever I do with the building foundation, and, the "something yet to be determined" it will go on, I want to make it portable. . .


My wood floor is pretty rugged--it was recycled from an old foundry, and installed as is. . . . so, my penchant for weathering extends to interior finishes!

Thanks for looking.  There are photos of every step in earlier posts. . .
In light of my recent conversion to O scale I am interested in selling a backlog of HO kits and miscellaneous items. If you are interested drop me a note.  Items are being dropped from the list as they are sold, so, if you want something, ask before it disappears. . .I would gladly entertain offers on groups of items, especially the car kits or plastic buildings.  Thanks for your interest.


MFG Number Name Desc.
Builders in Scale
Weiry and Son New, Box Wear s


C&C Crow
NP Mississippi Tower New, Dust s


California Model
Triangle Cafe Opened by prior owner, appears complete s


Downtown Deco 1049 Patterson Hardware New in Shrink, bought after release s
Fine Scale Miniatures Jewel 9 Bartholow Coal New s
Fine Scale Miniatures 155 Coal Dock New, Box Wear s


Laser Kit
Polar Bear Cafe New s


Microscale
Wintersrun Tower Opened by prior owner, complete s
Sheepscot
Beanfield Siding Opened by prior owner, complete s


Sheepscot
Cats Head Pier New s


MFG Number Name Desc.
Funaro C 508 NH NE Caboose 1 of 2 New c
Funaro 6005 B+M XM SS Box New c
Funaro 6914 Abbots Twin Tank Milk New c
Funaro 6750 War Emergency Hopper New c
Funaro 1049 Dairyman's Milk New c
Funaro 6970 J+L Coal Tar Tank New c
Funaro 6321 DLW 1924 Phoebe Snow New c
Funaro 7030 National Oil w/AB Brake New c
Funaro 6181 Wood Sealy Hopper New c
Funaro 3052 Wabash Box Unwrapped, may be damaged but looks OK c
Funaro 7084 Wabash Auto Box New c
Funaro 7090 Erie Covered Hopper New c
Funaro 6650 GTW Auto Box New c
Funaro 6590 B+M Well Hole Flat New c
Funaro C508 NH NE Caboose 2 of 2 New c
Tichy 4026 USRA SS Box Westerfield Decal Clinchfield c
Tichy 4030 SS Cement Service
c
Tichy 4026 USRA SS Box Westerfield Decal West. Maryland c
Tichy 4026 USRA SS Box Westerfield Decal NS c
Westerfield 11601 R7 Reefer Orig. Roof One Piece Body c


Westerfield 2501 Comp. Gondola CM+St.P Milw.
c
Westerfield 3803 Boston and Maine, USRA DS Orig. One Piece Body c
Westerfield 6003 ACF 40' Reefer, 1911-1920's 1911-1920's Art c
Westerfield 2201 Clausen Pickle Coffin Tank Car
c


MFG Number Name Desc.
Athearn
GP38-2 2007 P+W Ready to Roll, looks good, may have loose hand rail m
Atlas
H-16-44 NH 564 Master Series m


Faller B-945 Coal Mine Opened by prior owner, appears complete m
Kibri 9492 Station Reichelsheim Opened by prior owner, appears complete m
Kibri 8365 Row House Opened by prior owner, appears complete m
Kibri 9350 Station Feldafing Opened by prior owner, appears complete m
Vollmer 5711 Coaling Facility Opened by prior owner, appears complete m